In this edition of OK to Make Money Online, let's concentrate on getting your site indexed by Google. Now, I cannot guarantee you will be indexed, that is solely up to Google, but if you follow the rules, you most likely will be indexed.
So, look at the best practices outlined so far:
1) You have a proper blog setup and active using either Blogger account or a domain name hosting Wordpress or Joomla.
2) The title of your blog contains your keyword(s) mine is Make Money.
3) You have an “About” page that includes your long tail keyword and a back link to your site.
4) You have copy and revised Google's Privacy Page example or copied my Privacy Page and revised it.
5) Check that your site is verified and contains a Sitemap link in Google.
6) Two or more original articles are posted on your site using your keywords.
7) You have multiple tags per article, at least 10 relevant tags.
8) When using WordPress, you have multiple categories.
9) You have installed your Technorati link and claimed your site.
Getting indexed in the Google search engine is our next task. If you are not indexed, it will be very difficult for someone to find you using the Google search engine. So how are you indexed? After you have polished up your Blog and have registered with Adsense it's time to get you indexed.
Remember that Adsense account we just created in Make Money – Adsense? Log in to that account and click on the "Resources" tab. On this page, under References, find the "Webmaster guidelines" and click it. On the next page, about half way down the middle column will be "When your site is ready" and under the title you will see a hyperlink to addurl.html. Click on this link.
This new page will have a sub-title called "Share your place on the net with us." In the URL input text field type your blogs URL address. Then add a comment and your keyword. Enter the squiggly name to verify a human entered the text and press the Add URL button.
After entering the squiggly letters correctly, you should see something like "Thank you, Your site URL has been successfully added to our list of URLs to crawl. Please note that we do not add all submitted URLs to our index, and we cannot make any predictions or guarantees about when or if they will appear", that how you make money.
The next edition of OK to Make Money online will be SEO for your blog.
BigBear
Showing posts with label Business Marketing. Show all posts
Showing posts with label Business Marketing. Show all posts
Friday, May 29, 2009


Friday, April 10, 2009
Ok To Make Money Online – Creating a Sitemap
Increase your ability to get indexed faster in this article of OK to Make Money Online.
1st Step: Assuming you are using Blogger let’s get started.
Now log yourself into Google’s Sitemap page. Just under the title Dashboard you will find Add Site. Type in your site URL name in the space provided.
Note of Caution: During the process I my OK to Make Money Online site with "www". Later when getting the Sitemap from Blogger, Google gave me errors back. It seems that the Sitemap generated by Blogger did not need a ‘www’ prefix. I had to go back and submit another site without the “www” prefix.
To check your site information in the atom.xml (Sitemap file) type in http://your.blog.blogspot.com/atom.xml into I.E. using your URL name of course.
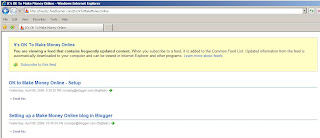
If you hover over the first title "OK Make Money Online" displayed in blue you will see at the bottom, when using “IE”, the URL for the title. If there is no “www” then enter your URL with no prefix.
Go back to Google's Sitemap page and click the OK button. Google will tell you the site has been added. In my case "OK to Make Money Online" was added.
2nd Step: Verify your ownership of blog. Google want you to verify that you own this blog. Press the word ‘Verified?’. This will take you to the “Verify a Site” page. You should see your URL site name just below the title line "OK Make Money Online" and a Box that says looks like:
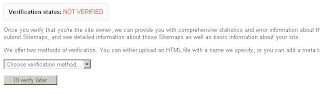
Choose the verification method; Using Blogger the only choice you have is using a Meta tag below:

Go to Blogger and sign in to your account. Click on the “Layout” tab in the upper left corner. Then click on the “Edit HTML” tab. Scroll down from the Top and find the "head" tag. Copy and Paste the text from Google’s Meta tag window just after the "head" tag.

Press the SAVE TEMPLATE button. You may sign out if you want but you don’t need to.
Returning to Google’s “Verify a Site” page. Click the “Verify” button. You should now see the Overview Page with your URL listed at the top.
3rd Step: Adding the Sitemap.
Now that Step 2 is complete we need to provide Google with a Sitemap in my case for "OK to Make Money Online". This will help Google when you republish a page, add more articles, archive pages, etc.
Click the Sitemaps button on the left side of the Overview page. You will now be in the Sitemaps page and your URL should be listed under the title.
On your right should be a place to input text and button Submit Sitemap, enter the text “/feeds/posts/default?orderby=updated” in the field and press the Submit Sitemap button. Google will give you a confirmation message and display the following:

It will take a couple of hours to crawl your site and there is not guarantee that Google will list it. But be patient it does take time. My blog "OK to Make Money Online" was verified in a few hours.
BigBear
Tags: make money, blogging, blog, tags, marketing, sitemake, blog marketing, blog promotion, successful blog
1st Step: Assuming you are using Blogger let’s get started.
Now log yourself into Google’s Sitemap page. Just under the title Dashboard you will find Add Site. Type in your site URL name in the space provided.
Note of Caution: During the process I my OK to Make Money Online site with "www". Later when getting the Sitemap from Blogger, Google gave me errors back. It seems that the Sitemap generated by Blogger did not need a ‘www’ prefix. I had to go back and submit another site without the “www” prefix.
To check your site information in the atom.xml (Sitemap file) type in http://your.blog.blogspot.com/atom.xml into I.E. using your URL name of course.

If you hover over the first title "OK Make Money Online" displayed in blue you will see at the bottom, when using “IE”, the URL for the title. If there is no “www” then enter your URL with no prefix.
Go back to Google's Sitemap page and click the OK button. Google will tell you the site has been added. In my case "OK to Make Money Online" was added.
2nd Step: Verify your ownership of blog. Google want you to verify that you own this blog. Press the word ‘Verified?’. This will take you to the “Verify a Site” page. You should see your URL site name just below the title line "OK Make Money Online" and a Box that says looks like:

Choose the verification method; Using Blogger the only choice you have is using a Meta tag below:

Go to Blogger and sign in to your account. Click on the “Layout” tab in the upper left corner. Then click on the “Edit HTML” tab. Scroll down from the Top and find the "head" tag. Copy and Paste the text from Google’s Meta tag window just after the "head" tag.

Press the SAVE TEMPLATE button. You may sign out if you want but you don’t need to.
Returning to Google’s “Verify a Site” page. Click the “Verify” button. You should now see the Overview Page with your URL listed at the top.
3rd Step: Adding the Sitemap.
Now that Step 2 is complete we need to provide Google with a Sitemap in my case for "OK to Make Money Online". This will help Google when you republish a page, add more articles, archive pages, etc.
Click the Sitemaps button on the left side of the Overview page. You will now be in the Sitemaps page and your URL should be listed under the title.
On your right should be a place to input text and button Submit Sitemap, enter the text “/feeds/posts/default?orderby=updated” in the field and press the Submit Sitemap button. Google will give you a confirmation message and display the following:

It will take a couple of hours to crawl your site and there is not guarantee that Google will list it. But be patient it does take time. My blog "OK to Make Money Online" was verified in a few hours.
BigBear
Tags: make money, blogging, blog, tags, marketing, sitemake, blog marketing, blog promotion, successful blog
Sunday, April 5, 2009
OK to Make Money Online - Adsense
In this Article of OK to Make Money Online will take a look at how to setup your account with Adsense.
On the other hand, if you focus your Blog on snow skiing equipment for the aggressive downhill skier and more specifically the best skies, boots, and poles you will get better and more targeted ads.. Then the people placing the ads will want space on your Blog and the more popular your blog is the better.
Now both Blogs will make money online but the one with the more targeted Blog will get the performance ads and the performance ads pay better than the general ad even when the general ads have a higher CTR (click through rate) then the targeted ads. In another article about of it’s ok to make money online we will cover, poor conversion, poorly optimized page, poorly optimized traffic, smart pricing and low CTR.
For now lets get you Adsense account setup and start the process. So how does this all work? First we need to sign up with Google’s Adsense team and second we need to place Adsense html code in the Gagets on you blog. Go to Google’s Adsense web page at http//Adsense.com and enter your Blog’s URL, select English for Website Language. Make sure to check the “I will not place” boxes before moving to the next selection.

Now complete the Contact information. If you select business instead of individual make sure you have a registered business with a legal DBA and a Federal Tax ID number.

Before hitting the Select Button you must check and agree with the last three boxes above the Submit Button.
The next page will be Google’s confirmation page, check the information before continuing. You will be asked for your Google Account if you don’t have one don’t worry you can set one up from this page just follow the directions.

Enter your Google Email address and Password. This will complete your Adsense application and the next screen will be a confirmation screen and a notice that it will take Google 1-2 days to review your application.

In our next article of OK to Make Money Online well will cover the placement of the Adsense ad boxes in your Blog.
BigBear
Tuesday, March 24, 2009
Make money online - Overview
Welcome to make money online. This site provides tips, how-tos and techniques to help you make money online. If you have any questions not covered in It's OK to Make Money Online please feel free to email your question to info@EcommercesSolution.org.
Monday, March 16, 2009
Setting up a Make Money Online blog in Blogger
In this to Make Money Online article we will setup a new Blogger account and create your first Blog.
Go to www.blogger.com, make sure you have a valid email account before you use the Create Account button. If you don’t have an email account go to www.gmail.com and set one up it’s free.
With your email account in hand press the “Create Account” button.
Now using your keywords enter them into the Blog title and the Blog address (URL). Now you might want to title your blog “Simple Simon” and using the address “http://simplesimon.blogspot.com “. But when you check if it is available you would be told the address was already taken.
When this happens try changing the spelling, reverse the words, add a word, until you find that the address is available. I tried http://simple-simon-blog.blogspot.com and it was available.
Enter the word verification. I don’t know about you but sometimes I need to do this more than once, I am just not always sure of the spelling. It will let you do it again but there may be a limit. Then press the continue button.
This will bring you to the template selection page. The default is fine and you can change it later if need be so hit the continue button.
Now hit the “Start Posting” button.
I suggest we do something simple first. Let’s create an “About Blog” page. In the title enter “About Blog” and in the large box tell your reads what this Blog’s purpose and what your vision is for your new Blog.
When your done press the “Save Now” button. Then press the “Preview” to view your new “About Blog”. If your happy then press the “Publish Post” button.
Now, press the “Settings” tab at the top.
Fill description, you can borrow some from your about article. Use your keyword at least once and if you can twice in your description. Go to the bottom of the page and press the “Save Settings” button.
At the top under the “Settings” tab press the "Formatting" tab.
Set “Show” to 1 instead of the default of 7. Check your time Zone, it should be correct it not set it.
Set “Show Link Field” to Yes.
Go to bottom and press the “Save Settings” button.
At the top under the “Settings” tab press the "Commits" tab.
Set “Backlinks” to Show.
In “Comment Notification Email” enter your email address.
Press “Save Settings” button.
That it. You can now go back and publish as many article as you like.
Subscribe to:
Posts (Atom)
Subscribe To


 Posts
All Comments
Posts
All Comments


